A laser diffraction system is made up of two main components, the optical bench, which collects the scattering data from a sample, and a dispersion unit which must accurately deliver the sample to the optical bench. This technical note describes how the optical bench and dispersion units are tested and how system to system reproducibility of laser diffraction instruments can be assessed.

|
The optical performance of a laser diffraction system is verified by measuring standard reference materials. The performance of every optical bench produced by Malvern Instruments is tested using a range of NIST traceable latex standards. A range of latex sizes is required to produce scattering data over a wide enough angular range to test all of the detectors. When the correct scattering signal is recorded on all of the detectors then the measured particle size will be within a certain tolerance of the specified latex size.
During production each optical bench is tested with a range of latex standards, generating a significant data set from which the reproducibility of the optical benches can be assessed. In this section the results of measurements of a range of latex sizes, on 100 optical benches, are presented to demonstrate the reproducibility of the optical benches.
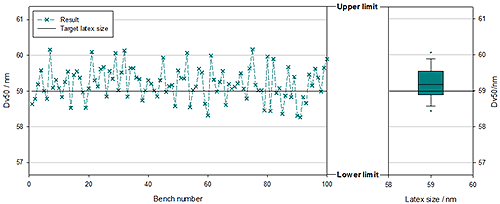
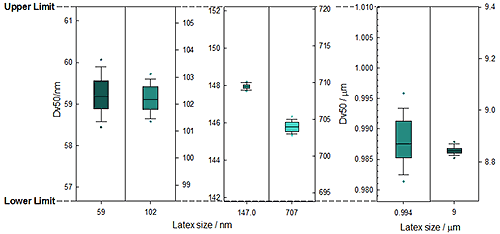
Figure 1 shows the results of measurements of 59nm latex on 100 optical benches. The scatter plot shows the measured Dv50 where the limits of the size axis show the acceptable range of the results. The same data is also represented in a box plot in Figure 1. Data sets for the other latex sizes are similarly represented in box plots in Figure 2.
| Measured results | ||||||
|---|---|---|---|---|---|---|
| Latex size | Lower limit | Min | Average | Max | Upper Limit | % RSD |
| 58nm | 56.7 | 58.3 | 59.2 | 60.2 | 61.4 | 0.77 |
| 102nm | 98.4 | 101.2 | 102.2 | 103.3 | 105.6 | 0.52 |
| 147nm | 141.8 | 147.6 | 147.9 | 148.2 | 152.2 | 0.10 |
| 707nm | 693.8 | 702.6 | 704.0 | 705.9 | 720.3 | 0.11 |
| 0.994um | 0.978 | 0.981 | 0.988 | 0.997 | 1.0 | 0.41 |
| 9um | 8.648 | 8.807 | 8.845 | 8.889 | 9.4 | 0.19 |
Table 1 shows the statistics for measurements on 100 benches, including the average, maximum and minimum values, compared to the target size range. Table 1 also shows the relative standard deviation (RSD) over the 100 measurements. The RSD is less than 1% for all latex sizes across the 100 benches, showing reproducibility better than the ISO standard states for repeatability of a single sample [1].
Optical performance is only part of a laser diffraction system, it is also important to test the performance of the dispersion units as these are responsible for accurately presenting the sample to the optical system. There are different requirements of a sample used to test the performance of the dispersion unit; the material must have a broader size distribution in order to test sampling from the dispersion unit, it must also require some energy to suspend and disperse it so that the dispersive performance of the accessory is tested.

|
Malvern has developed a Quality Audit Standard (QAS) which meets all of the requirements of ISO 13320 for a certified reference material. Glass beads are an appropriate reference material for laser diffraction as they are spherical particles with well-known optical properties.
The particle size distribution of the sample must be greater than one decade in size. The width of the size distribution is specified as the ratio of the Dv90/Dv10 which must be between 1.5 and 10. For QAS the Dv90/Dv10 is approximately 2.3, see Table 2.
Sampling bias is removed from the measurement process by using a single shot sample. These single shot vials are produced by riffling down from a master batch into appropriate masses for each dispersion unit.
A full measurement procedure is defined for each dispersion unit [2] setting such parameters as measurement duration, stir speed, air pressure and vibration rate to ensure full dispersion of the material.
The target size and pass/fail criteria for QAS have been measured on a reference laser diffraction system which has been verified using NIST -traceable polystyrene latex standards. Therefore, as a reference material, QAS is indirectly traceable to NIST. The pass/fail criteria have been set, according to the ISO standard as follows; the Dv10 must be within 3% of the target value, the Dv50 within 2.5% and the Dv90 within 4%.
The performance of each dispersion unit is assessed by measuring QAS samples using a single optical bench. Each system is tested during production and a significant data set has been acquired from which system to system reproducibility can be assessed.
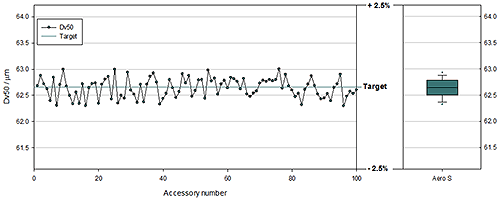
The reproducibility of the dry dispersion units, Aero S, was assessed by measuring QAS samples using 100 dispersion units. In Figure 3 the scatter plot shows Dv50 from these 100 measurements vs accessory number, a line has been added to show the target value and the size axis extends to ± 2.5% of the target value. The same data is also represented in a box plot in Figure 3.
The average values and RSDs from these QAS measurements using the Aero S are shown in Table 1. The RSDs are less than 1% for all parameters, demonstrating system to system reproducibility better that the repeatability of a laser diffraction measurement, as stated in the ISO standard.
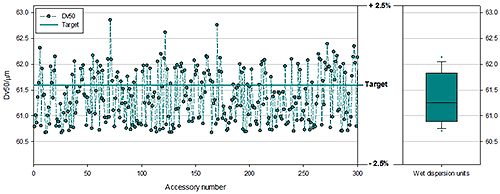
The reproducibility of the wet dispersion units was tested by measuring 100 QAS samples on each of the wet dispersion units, Hydro MV, Hydro LV and Hydro EV. The Dv50 vs. accessory number for all 300 wet QAS measurements is shown in Figure 4

|
The statistics from the wet measurements are shown in Table 2. When the data from all wet units is combined the RSDs are less than 1% showing excellent reproducibility across the range of dispersion units. The RSDs for individual dispersion units are even lower.
This level of reproducibility between the dispersion units simplifies the process of transferring methods and specifications between sites and different dispersion units.
| Accessory | Dv10 μm | Dv50 μm | Dv90 μm | |||
|---|---|---|---|---|---|---|
| Average | %RSD | Average | %RSD | Average | %RSD | |
| Aero S | 38.23 | 0.41 | 62.64 | 0.30 | 89.49 | 0.39 |
| Hydro EV | 36.08 | 0.35 | 60.82 | 0.15 | 88.74 | 0.52 |
| Hydro MV | 36.67 | 0.37 | 61.28 | 0.29 | 89.33 | 0.63 |
| Hydro LV | 36.83 | 0.57 | 61.95 | 0.38 | 89.62 | 0.44 |
| All Wet | 36.53 | 0.99 | 61.35 | 0.81 | 89.23 | 0.67 |
The reproducibility of laser diffraction instruments requires both the optical bench and dispersion units to be tested. A range of latex standards have been measured on 100 optical benches in order to test bench to bench reproducibility. The results show a relative standard deviation over the one hundred measurements of less than 1%.
The reproducibility of the dispersion units have been tested by measuring QAS samples on one hundred of each type of dispersion units. This showed a relative standard deviation of less than 1% for the 100 measurements on each dispersion unit, and across all of the wet dispersion units combined.

|